Dentist Visual Identity System
Client Project - Dr. Charles J Pereversoff Jr.

Stationary mockups
Description of project
Working in consultation with the client, I designed a visual identity for the oral surgery and dental practice of Dr. Charles Pereversoff Jr. Along with establishing a visual identity that will be applied to several print applications, guidelines were also designed.
Design Brief
Context
Dr. Charles Pereversoff Jr. is looking to update and redesign his dentistry personal brand. The visual design will strive to communicate and reflect who he is and what he does. Because he is a family and general dentist, he is concerned with oral health and hygiene at every stage of life. Dr. Pereversoff Jr. provides primary dental care, as well as emergency dentistry, and oral surgery.
His late father, Dr. Charles John Pereversoff Sr. practiced dentistry for 49 years at the same location of the current office. He took great pride in his dentistry practice, and his son Dr. Charles J Pereversoff Jr. works hard to preserve his father's legacy. Just as his father, Charles enjoys the outdoors with hobbies such as gardening, fly fishing, and skiing.
Dr. Charles Pereversoff Jr. is a solo dentist at his practice. He takes care of all dentistry and surgery, as well as administration solely by himself. He works hard to make personal connections with all his patients, and takes pride in his work.
Dr. Charles Pereversoff Jr. is not looking for a mainstream/traditional visual representation of his dental practice. For his logo, he is adamant that he does not want imagery of teeth and is looking for something that represents him as a person, instead. After consultation, I discovered that he wants to reflect his down to earth, friendly, but professional personality.
Analysis of Problem
Dr. Charles Pereversoff Jr. does not have a fully personalized identity system. Currently, he has a business card and outdated note paper passed down from his father’s practice. The business cards are simple, basic, and clinical. The one-sided card contains his name, what he does, the dentistry logo, a phone number, an address, and a visual of teeth with a blue line (floss) running across the card. The note paper has an incorrect name across the top which has been passed down from his father’s practice.
Analysis of the Need and Aim
After consultation and meeting the client, I found that he is a very friendly and personable man. From further research, I found that his patients love him and give him great reviews. The patients positively comment on his professional nature, his skill, and friendly, laid back personality.
The visual identity will need to be unique to reflect his down to earth nature, his personal connections with his patients, his knowledge/ professionalism, and his amiable personality. He requires a logo that sets him apart from other dentistry practices. He is a unique dentist and it is important to highlight that detail. Interestingly, and distinctively, Dr. Charles Pereversoff Jr. is a left-handed dentist.
Existing Solutions
The existing solutions are all very similar. Most visual identities for dentistry practices use the colour blue, light colours, and have visual depictions of teeth, toothbrushes and smiles. Overall, the logos do not look personable; they look like a typical visual a patient would expect from a dental practice.
Ideation
Moodboard
After talking to the client and doing additional research, I created a moodboard to help me visualize a distinct style. From the moodboard, I chose suitable colours.

Moodboard elements

Process work
Ideation 1
I was thinking about rustic outdoor design. I considered outdoor patches and how I could incorporate that into something that looked professional. For this ideation, I was inspired by the shape of floss containers. I took that shape and created a patch that included mountains, trees and a river. I paired that visual graphic element with a stacked modern sans serif typeface. After having the second client meeting, I learned that the client did not like round shapes, but rather, preferred sharp corners and sharp shapes.
Ideation 2
For this ideation, I was thinking about plaques and outdoor companies’ logos. These logos used a serif typeface that gave the logo an established historical feel. The logo incorporated mountains where dental tools made up the center peak. The tools cross each other, similar to the outdoor logo “x’s”. The client did not like this one because of the dental tools depicted; he did not want any noticeable dental tools in the logo.
Dr. Pereversoff Jr. chose Ideation 3.
Ideation 1 process work

Ideation 2 process work
Brand Identity

C: 73
M: 39
Y: 0
K: 80
C: 55
M: 23
Y: 0
K: 44
C: 25
M: 10
Y: 0
K: 7
C: 48
M: 0
Y: 9
K: 25
C: 0
M: 0
Y: 0
K: 0
Moodboard & Colour palette
Colour
Through colour research, I found that the colour blue evokes a sense of trustworthiness. Earning a patient's trust is one of the most essential components to creating long-term doctor-patient relationships. Blue is used in dentistry to do just that by tapping into the patients psychological subconscious. Blue is also reminiscent of the outdoors - the setting of Dr. Peveversoff Jr.’s favourite pastimes. As well, blue is Dr. Pereversoff Jr.’s favourite colour.
I chose to use five colours. The light blue, light navy and mint green colour are the primary colours used in the logo. These colours are also used in different parts of the system; for example, they are used for type colour and chart colours. The dark navy and white are secondary colours used for backgrounds at full bleed.
Tone
Professional
Down-to-earth
Subtle (not flashy)
Connections
Historical
Trustworthy
Simple
Laid-back
Friendly
Typeface
After meeting with the client and taking a tour around his practice,
I noticed that he enjoys preserving history. Some of the older pieces (old plaques, father’s notepad, old dental machine, wood office wall) contrasted with the new aspects of his office (dental machines, outdoor photos). This gave further insight into his personal style. He is progressive, yet respectful of the past.
When choosing a typeface. I wanted something that was bold and modern, but also something that looked reminiscent of history. The typeface chosen for the logo was Copperplate. This is a very bold serif typeface. It both looks modern and historical at the same time. Because it is a serif typeface, it adds a sense of trust and reliability.

Typefaces used in system
Logo
Text Element
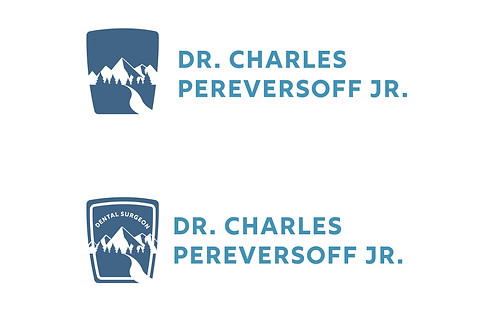
As previously stated, the typeface used for the logo is Copperplate. For Dr. Charles J. Pereversoff Jr. I used the bold version to highlight that this is his practice. For Dental Surgeon, denoting his specialty, I used the regular typeface to establish hierarchy within the logo. The client liked the idea that the whole logo was in capital letters. Dr. Pereversoff Jr. required that the dental surgeon was included in his logo for legal purposes, but it also gives context for the logo. Because the dentist’s name is considerably long, I chose to stack his name in a left alignment. The tracking between the words and the periods were minimized to create a better flow between words where the eye would not sit in a space or focus on a period. The lines between the dentist’s name are closer together to show that that is a separate grouping to the dental surgeon grouping.
Graphic Element
Dr. Pereversoff Jr. wanted a unique visual for his logo. He likes to stand out from the competition and did not want a logo that only reflected his dental practice. He preferred to have a logo that embodied his love for the outdoors and something that reflected who he is.
My approach is professional with an outdoor twist. I thought it was still important to have some visual aspect of a dentist to show patients that he is infact a professional dentist. The graphic element of the logo is made up of a small forest of trees and a river. These outdoor elements abstractly take on the shape of a toothbrush, where the bristles are the trees and the river is the handle. In every version of the logo, the trees are always mint green to reflect health and mint toothpaste. There are two layers of trees to add dimension to the logo. The river’s colour has two options, a light navy or light blue, depending on the background colour.
Primary logo
The primary logo consists of the text element and the graphic element. Text elements are stacked on the brush handle of the graphical element. The graphic element is at the highest level of hierarchy, where the brush handle/river leads the eye to the name, and finally to the title of dental surgeon.
The secondary logos are the text logo and the graphic logo. The text logo must be accompanied by the graphic logo. They must be seen on the same page in order for patients to make a connection that those are the logo elements. The graphic element size may be increased larger than the text element, but may not be smaller than the text element. The graphic element can be used alone, in accompaniment with the text logo, or in accompaniment with the primary logo.
The logo has two main colour options. A dark logo for light background, and a light logo for dark backgrounds. It was important to design two, because depending on the background colour, the highest level of hierarchy needs to stand out.

Textual Element

Graphical Element


Dark Primary Logo

Light Primary Logo
One Colour: Black and White Primary Logo
Deliverables
Business Cards
The front of the business card consists of a dark navy background, with the light version or the text element and the graphic. I used them separately to increase the size of the graphic element so that the handle is cropped and bleeds off the card. This provides visual interest. I chose to design a dark business card in order for it to be eye-catching in a world of white dental business cards.
The back of the card includes the dentist’s information in Myriad Pro in order for the information to be read easily. This information is located on the bottom-left corner because English is read left to right. As well, the information is situated in that way to create plenty of space for Dr. Pereversoff Jr. to write appointments or notes for his patients.
Notepad
The notepad is kept simple. It is completely white so that Dr. Pereversoff Jr. can write as much as he wants. The only things added are the logo in dark at the top-center, and his information at the bottom-center.
Envelope Version 1
I designed two envelopes: one that I feel has a stronger design, and one that is more practical for the client. After meeting with the client for the third and final time, I took into consideration his preferences in both these designs.
This envelope design is a design I feel is stronger in the system, and whatI wish for the design. The envelope uses a dark background with the light versions of the logo and graphic element. The #10 envelope is a single- window for the patient's name and address. Printed on the front side is the dentist’s name and address, along with the graphic element. The back side contains the full primary logo. The flap of the envelope has a pop of colour that accents the green from the trees. I chose to use a single-window envelope to create more freedom on the stationary letters and documents included within the envelope.
Envelope Version 2
This envelope is something more closely resembling what the client asked for. The envelope is white with minimal uses of colour, thus making it more cost effective. The envelope has two windows: one for the patient's name and address, and one for the dentist’s name and address. This envelope uses the dark logo elements.
Like the dark envelope, the front side contains the graphic element, and the back side contains the full primary logo. The flap of the envelope has a pop of colour that accents the green from the trees. Although this envelope is very similar to the other, it may be more cost-effective; however, it may limit what the internal documents look like because of the placement of the dentist’s name.
Billing Statement Version 1
Like the envelope, I created two versions of the billing documents. I designed this statement with professionalism in mind, and made it easy to understand. I broke up the date and procedure from the charges, in order to first see what the patients are billed for, then the number and balance. The number on the side of the chart corresponds to the numbers on the later one. I moved the credit card payment to the side of the page in order to make the document fit within the system created. The primary logo is in the top left-hand corner with the dentist’s information. The patient's name and address is located in a spot where it can be accessed through the envelope window.
Billing Statement Version 2
This billing document follows the layout provided from the client. He was not sure how much this document could be changed. I cleaned this document up and designed it so it fits within the new system. The dentist and patient's name and address are positioned so that they fit in the two windows of the envelope. The logo is moved to the right corner so it does not get in the way of the windows.
Business Letterhead
Because this document needs to look professional, I choose to keep the background white. The body text is in light navy in Myriad Pro, in order for the information written to stand out. The top right-hand corner holds the dark version of the logo. Along the left side is important information such as date and personal information highlighted in green.
Neon Sign
Because neon signs are not angular, I had to design the neon sign’s logo with rounded corners. As well, neon signs do not have fills or full shapes thus the tree graphic is outlined instead. The client wanted the full logo, as well as his practice’s number on the sign.
I used the light version of the logo to make the colour stand out more in the dark.


Front of Card 3.5 x 2 inches
Back of Card 3.5 x 2 inches

Notepad 4 x 5.25 inches


Front side #10 Envelope
Back side #10 Envelope


Front side #10 Envelope
Back side #10 Envelope

Billing Statement Version 1, 8.5 x 11 inches

Billing Statement Version 2, 8.5 x 11 inches

Letterhead, 8.5 x 11 inches

Neon Sign in situ, 7.8 x 11.8 inches
Brand Guideline Package
The design guide package contains a set of recommendations that are intended to provide clear instructions on how to adopt the visual idenity’s principles, and how to confidently apply logos, graphics, and type that follow the branding system.
The package includes a description of the system, a description of the typeface and colour, when to use each logo, how to use the logo for the best effect, and how not to use the logos.


Brand Guide Book Cover and Samples, 8.5 x 11 inches
Project Reflection
In this project, I learnt a lot about working with a client. This project caused me to release that listening to your client is very important to the design process. Like any design project, research is key. It was valuable having face to face meetings that allowed conversation and consultation. It is important to design something that is both what the client wants and asks for, and something you as a designer is happy with.
Further, this design project allowed me to use my creativity. It was not a conventional medical logo where the client wants to depict their profession. The dentist wanted his logo to convey his personality and love for the outdoors. It was important to design a professional dental logo that encompassed the dentist's goals for the visual identity. Throughout this design process, I learned how to better my presentation and communication skills.